When choosing a topic for our inquiry project, we were instantly drawn towards a tech in PE inspired blog as it is something that has always sparked our interest and is something we are interested in learning about. When beginning this project, we looked at the diagram below to help us figure out what to consider and how to go about this project. In this first post, we will be exploring the “I Wonder” block by going over our initial thoughts and questions.

For this inquiry we are hoping to explore technology in the sense of being physical education. We want to dive into the question of how can incorporating technology improve our health and fitness and how can it be utilized in the classroom. With this topic in mind, we will be considering things like:

  • What are the pros and cons of technology in PE?
  • What are the risks of technology in PE?
  • What types of technology can you incorporate? 
  • What different ways can technology be incorporated in the classroom?
  • What tips do people have for smoothly incorporating tech in PE?
  • What are the systems current stance on tech in PE? How do teachers currently feel about potentially incorporating it in their PE classes?
  • How can we educate teachers on utilizing technology in physical education?
  • What does the future of technology in PE look like?

Now that our questions are laid out, it is important that we consider how we will go about the rest of this project. With these questions in mind, we plan on exploring the investigate, record, discover, think, and try blocks of the diagram above. For the “investigate” and “record” blocks, we will do research on our different questions and begin formulating ideas. For the “discover” block, we will observe and examine different classrooms (as much as possible) and reach out to individuals who may have valuable information for us, for example, our PE teacher. For the “I think” and “I try blocks”, we will relate our findings to ourselves and think about how we could put them into action. Ideally, we would have liked to think of ways we could incorporate this into our upcoming practicum; however, with this being cancelled, it will be more of a theoretical application. Finally, the “reflect” block will be our blog posts where we post our journey of finding information and reflect on the outcomes. It will include some of the research we have gathered and links to sources that have guided our journey and findings. These posts will include pictures/videos of things we found interesting, cool, and educational. The blog posts will also be a place for us to consider how we can change/improve things and ask any further questions that may come up. Overall, with these blogs, our ultimate goal is to figure out something new about technology, expand our mindset on how technology can be used, and learn something that may be beneficial to us as future educators.

Photo Credits: Header photo by Alexandre Debieve on Unsplash & Diagram photo by Brynn Courtney

So far I have explored chest, triceps, back, biceps, legs, and core workouts. The only thing left to dive into is shoulders! Shoulders are often something we take for granted. Whether you are reaching over head to grab something on the top shelf at the grocery store or brushing your hair, you shoulder muscles play a pivotal role. This is especially true for athletes. Athletes you their shoulder muscle to swim laps, shoot a ball in basketball, bat a baseball, and more. For volleyball athletes, your shoulders are used vigorously and repetitively. Shoulders play a key role in moves such as hitting, serving, and even blocking. Without strong shoulders, you will inevitably be less efficient on the court.

So what are the benefits of having strong shoulders? The list is vast!

Strong shoulders result in:

  • Less injuries such as internal impingement and SLAP tears

– This is a result of increasing stabilization in muscles, ligaments, and tendons

  • Increased flexibility and shoulder health
  • Increased range of motion
  • Increased conditioning allowing your shoulder to last longer under strenuous activity
  • Enhanced posture
  • Increased hitting power
  • Increased arm swing speed
  • Aesthetic appeal

When considering how to properly and effectively strengthen your shoulders, it it critical consider a proper warmup. Without a proper warmup before a workout, especially with shoulders, it is very easy to injure yourself. In addition, for someone like me who has a previous shoulder injury, it is extra important to make sure you are properly warmed up

The Warmup:

Banded external rotations
  • 5 minute bike to get warm and get the blood flowing
  • Quick upper body roll out
  • Using a light resistance band do 10-15 internal and external rotations for both arms
  • Sleeper stretch
  • Using a light resistance band do 10 external rotations/arm at 90 degrees
  • Scapular wall slides
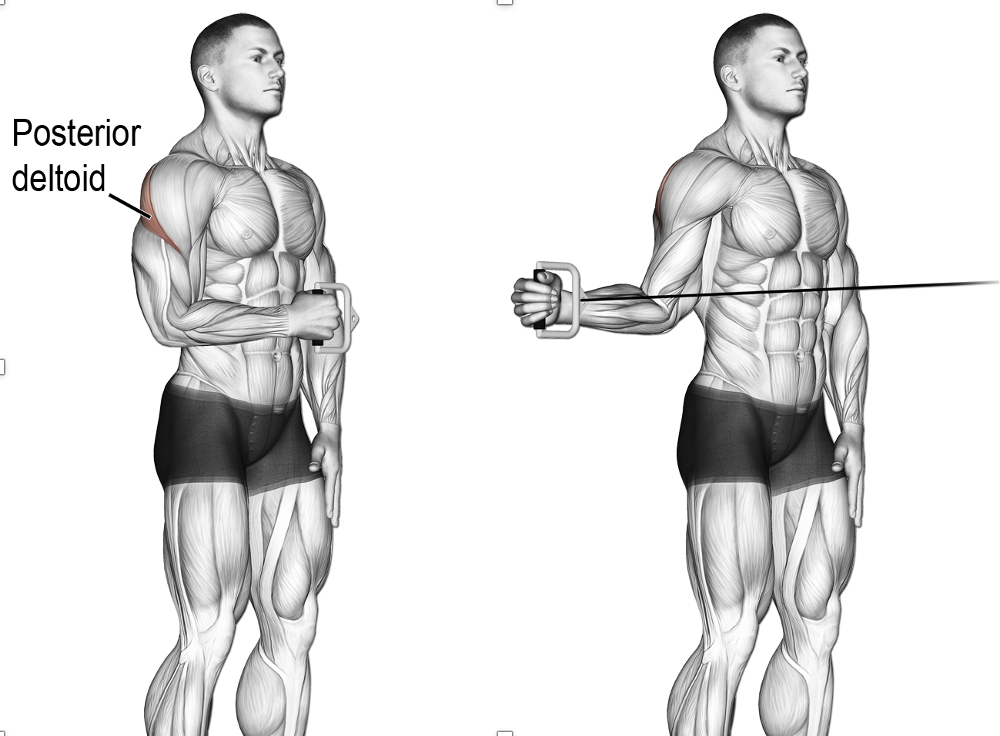
  • Using a light resistance band do banded pulls to warm up the back of your shoulders
  • Using a light resistance band do 10 shoulder opener repetitions

This warmup is an efficient and effective way to warm up your muscles as well as improve their mobility! This warmup should take around 15 minutes. After completing this you can begin the workout.

The Workout:

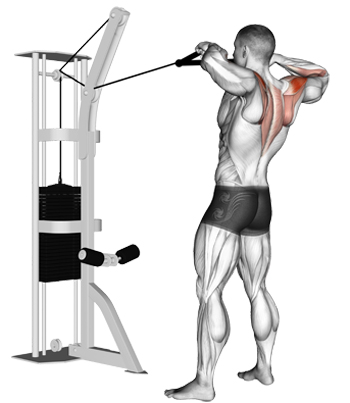
Rope face pulls
  • Y, T, W’s – 3 sets of 10 reps for each movement on each arm ( this can be done with light dumbbells, resistance bands, or body weight)
  • Front press 90 degree hold – 3 sets of 30 seconds/arm
  • Military press – 3 set of 6 reps
  • Seated dumbbell shoulder press – 4 sets of 10
  • Lateral raises – 3 sets of 10
  • Rope face pulls – 3 set of 10
  • Plate squat to press burnout – 3 sets of 15 reps with 30 seconds rest in between

This workout is geared towards mobility, stability, and strength. It is a well rounded routine that will hit all these areas and improve shoulder efficiency in athletes. I will be trying this workout for this first time tomorrow afternoon when I hit the gym! I looked forward to feeling the burn.

Photo Credits: Header photo by Scott Webb on Unsplash

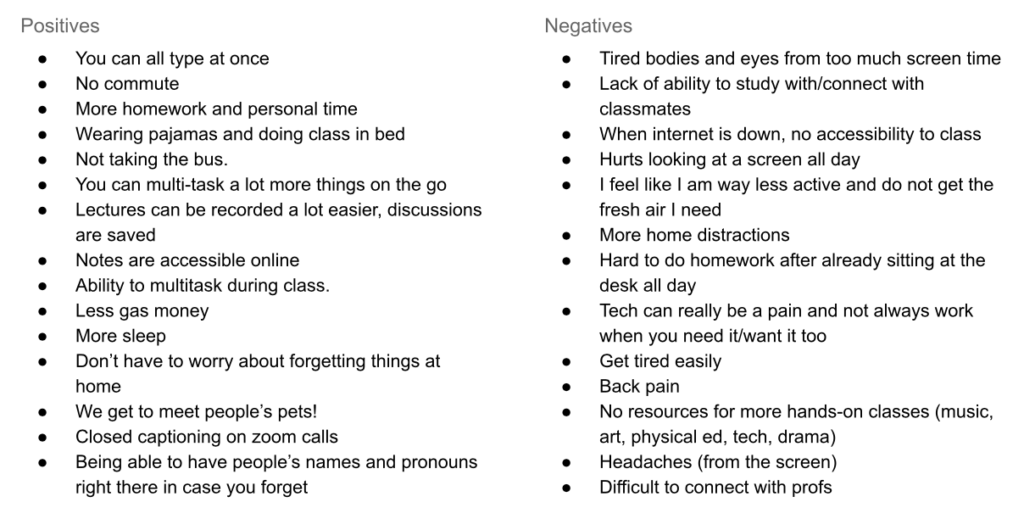
Today in tech we talked about distributed learning and some of the different ways this is executed. The first thing we did was create lists, as a class, about the positives and negatives of doing school from home. I found it really interesting to see the different perspective and hear how different some of our opinions were in the breakout rooms. For example, one of the girls in my breakout room said she does not think she could handle another semester of online schooling whereas for me, if I could finish the program online, I would. To me there are so many benefits of school from home, the extra sleep, more personal, less time commuting, less money on gas and parking etc. It was very interesting to see some of the differing opinions.

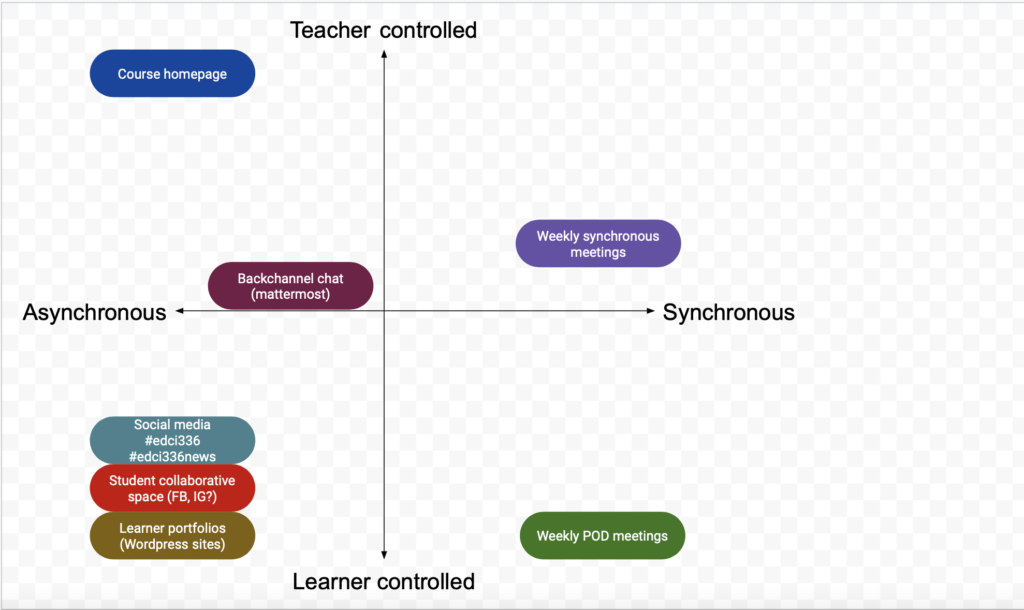
Next, we discussed the difference between asynchronous and synchronous learning. In asynchronous learning, the teacher and students are free to access the course material at their own leisure without a set time to meet. In contrast, synchronous learning occurs when teachers and students engage through some time of meeting, whether this is online or in person, and go through course material together. Some examples of asynchronous learning include things like Brightspace, Google classroom, and other platforms where content can be posted for students to peruse on their own time. This semester, we are experiencing

both asynchronous and synchronous aspects to our classes. Our music class is half asynchronous and synchronous. We have content posted at the beginning of the week that we are responsible for going through by ourselves and discussion post we must answer in our own time, and our second class a scheduled class where we meet over zoom. I personally think that combination of synchronous and asynchronous, as well as teacher controlled and student controlled activities, is nice. It gives a nice variety and balance to the content and class. For example, this class has a variety of different elements to it which can be seen in the chart I have included. For me, this is the best way to stay engaged and retain the information I am being given to learn.

Tired Tv Land GIF by TV Land Classic

Another thing we discussed this class was zoom fatigue. Studies have shown that it is true, people really do feel fatigued from being in zoom all day. Stanford researchers highlighted four points concerning the exhaustion that zoom causes:

1. Close up eye contact, at high amounts of volume, are highly intense
2. Seeing yourself constantly is tiring
3. Being online reduces you physical mobility (ie: walking)
4. The cognitive load is much higher in online video calls

I can definitely see how these factors effect some people. For me, I have adopted some strategies that help me mitigate the zoom fatigue as much as possible. First, I find it helpful to print of anything that can be; for example, any class reading we may have. This helps avoid unnecessary screen time. Next, while in class I often look away from my computer when I don’t need to be focussing on it. For example, lots of time in class it is sufficient to just listen to our teachers and do simple doodles or even just look off into space. I do this often and I am still fully engaged in what is being said but my eyes aren’t being strained by the computer. Finally, there is the physical movement aspect. I often will do little stretches or get up and walk around while I am on zoom to elevate some of the jitters and keep my body moving. I also make sure to do something active every day. For me this is easy because I am an athlete and I love being active but I know some people may struggle with this. Even forcing yourself to get out for a short walk can be a really good way to help ground yourself and shake off some zoom fatigue!

One final short note about todays class. We did this fun activity about where we all want to travel once we can again and I just thought this was really fun. I chose Thailand! I have never been but my significant other is from Thailand and we are planning to go and visit some of his family as soon as possible. I can’t wait!!

Photo Credits: Header photo by Glenn Carstsens-Peters on Unsplash

As you may have noticed, I took a little hiatus from my posts last week. I had an emergency surgery to get my wisdom teeth removed. There were some complications with the medications and what not but I am on the road to recovery now and back with some more information on how to become a better athlete!

In my last presentation, I had mentioned the core and how critical it is. I had said I would be diving into that deeper in its own blog post the following week; however, the wisdom teeth situation came up. So as promised, this week will be all about core! The benefits of having a strong core and how to get one. So let’s dive in!

step brothers abs GIF

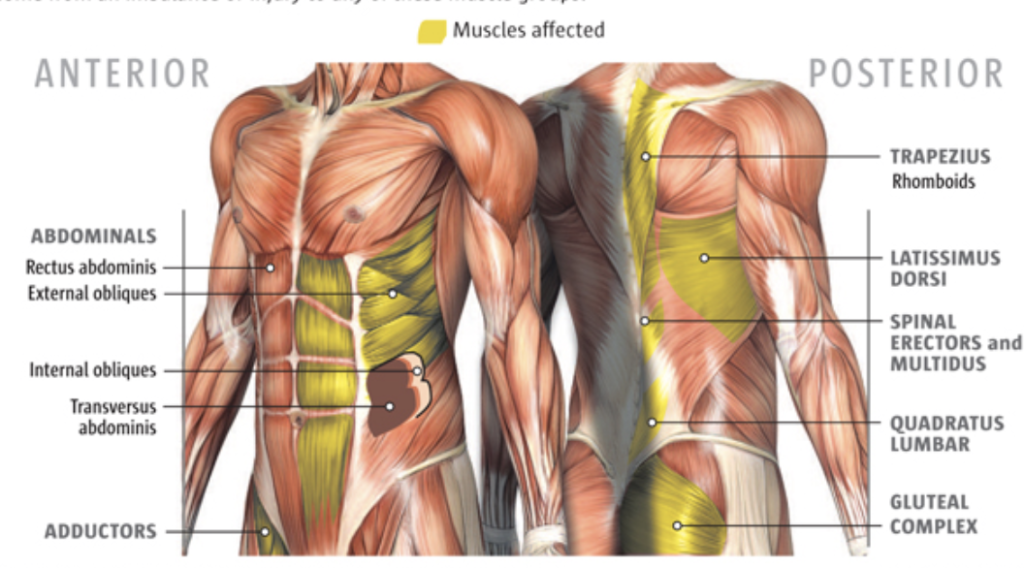
What is your core? Most people think of a six pack when they think of core but really, this is just the tip of the iceberg. The core actually wraps around your entire body and includes muscles on both you front and back side. These muscles include the pelvic floor muscles, transverses abdominis, multifidus, internal and external obliques, rectus abdominis, erector spinae and diaphragm, latissimus dorsi, gluteus maximus and trapezius. The core is

responsible for our stability and correcting muscles imbalance. This is critical, not just for athletes, but for everyone. Muscle imbalance means the you muscles are at varying levels of functionality, some are too loose, some are too tight, some are weak, and some are strong. When muscle balance occurs, injuries are like to occur. The core is responsible for spinal stability as well as preventing lower back, hip, knee, and neck pain. According to Andy Waldhem, who has his Doctorate of Philosophy in Kinesiology, there are “five different components of core stability: strength, endurance, flexibility, motor control, and function”. Waldhem believes that the first step to a strong core is developing proper motor control and function. Without this stability, are spine is left unprotected. After this, we move in other areas such as strengthening the core.

When considering the core in relation to athletes, there are some specific benefits worth mentioning. A strong core helps athletes:

  • Control their body position
  • Generate optimum power
  • Transfer force efficiently throughout their body
  • Improve rotational movements (such as spiking a volleyball)
  • Improve balance which allows them to hold body positions for an extended periods of time
  • Gain greater efficiency within movements (ie: you won’t waste as much movement in defence)
  • Improve core strength which results in improved stabilizing muscles. This allows for optimal muscle growth and strength in all other body parts
  • Increase flexibility
  • Prevent injuries

So now that we know what the core is, what it does, and why it is important, how do we train it? I have put together a workout after looking through countless resources and talking with trainers and this is what I have come up with!

The Workout:

In this workout you will have groupings of exercises that you repeat back to back with a short rest in-between round a longer rest between groupings.

Group 1:

  • Medicine ball dead bugs – 3 sets of 15-20 reps on each side
  • Lateral Crawl – 3 sets of 6 repetitions.
  • Squat and Press – 3 sets of 8-12 reps

Group 2:

  • Ab roller – 3 sets of 6-8 reps
  • Pallof press – 3 sets of 20 second holds on each side
  • Prone med ball toss – 3 sets of 8-12 reps

Group 3:

  • Stir the pot – 3 sets of 8 reps in each direction
  • Plank – 3 sets of 1 minute
  • Oblique plank on bench – 3 sets of 15-20 seconds on each side without moving **NOTE: This exercise requires a partner to hold your legs!**

So there it is! Get working those cores! I know I will be in the next couple days here when I can resume regular physical activity. I have my checkup tomorrow afternoon for my wisdom teeth and hopefully I will get the all clear so I can resume my workouts! Happy crunching!

*Quick side note: On the technology side of things, I am super excited as I finally figured out how to get my text to wrap around photos!! I have been trying to figure this out for awhile. It is really simple, can’t believe I didn’t figure it out sooner. Better later than never though!*

Photo Credits: Header photo by Jonathan Borba on Unsplash

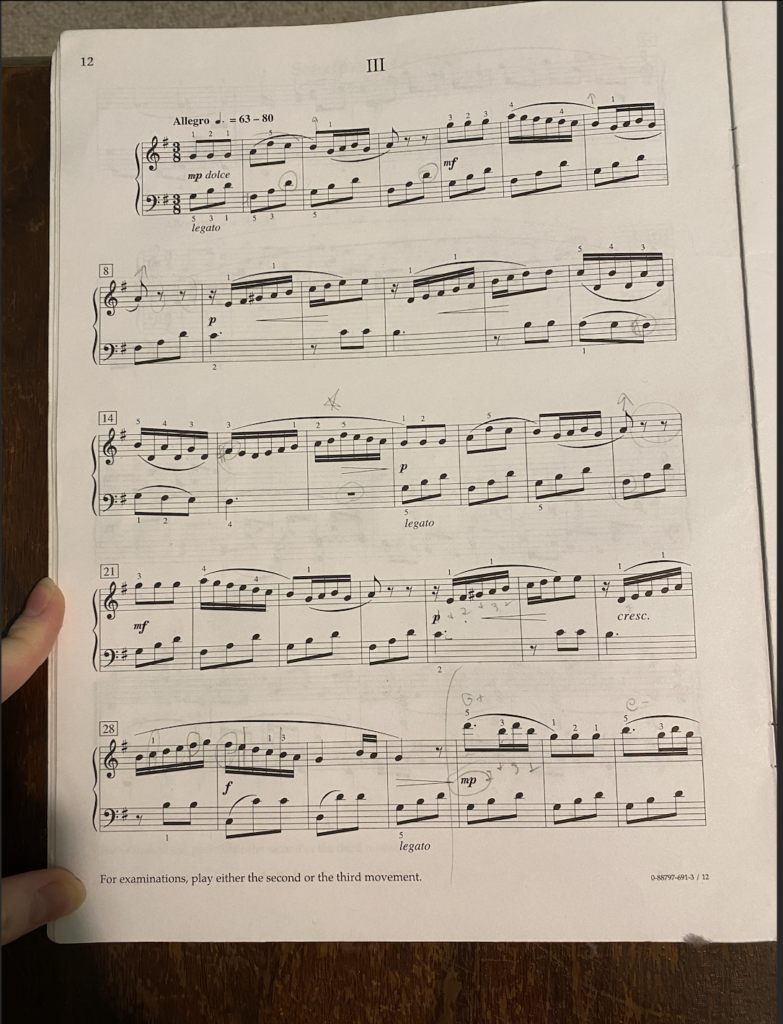
I had so much fun working on my last project for the midterm display; however, now it is time the change channels and focus on something a little different… piano. For the second half of the musical growth plan, I planned on working on learning Sonatina in G major by Muzio Clementi. This piece is 4 pages long and is in 3/8 time. It has lots of runs and stylistic elements to it. I have included a photo below of the first page of the sheet music from my music book. I am a bit nervous for this half of the musical growth plan as I think I may have bitten off more than I can chew. I do not have very long to learn this piece and with the end of the semester nearing, there are lots of final projects due that will be taking up a lot of time. It is going to be tough, but I am still going to try! Stay tuned to see what happens!

Sonatina in G major, Op.36, Part III by Muzio Clementi

To begin, I started by mainly listening to the piece a few times. If possible, it really helps to listen to a piece before learning it so you can get a feel for the rhythms and have an idea of what it is supposed to sound like. Because of this, I spent some time finding a good recording of the song that I could listen to a few times to get an idea of what the song should sound like. It will also be helpful as I’m working through the song if I get stuck on something or can’t figure a certain measure out. It is always nice to have a recording in your back pocket for this. I have linked the YouTube video that I have been using below if you are interested in taking a listen.


After listening to this recording for a few days, I sat down with my sheet music and began working on the right hand alone. It is definitely easier to learn a song, especially complicated ones where the right and left hand are doing different things, when you break it down and make it simpler. My strategy when learning songs is usually to begin with learning just the right hand alone, then learning the left hand alone, and then working on adding them together. So far, I have not made it past the right hand but that is ok. I am just starting to work on this piece and the right hand is usually more complicated than the left. It most definitely is in this case. In addition to breaking the hands up, it is also helpful to drastically slow the song down when you begin learning it. I have also been doing this. I am hoping by my next blog post that I will have the right hand down pat and can begin working on the left hand. I look forward to sharing my progress and some of the challenges I encounter in my next blog; but for now, here is a very short clip of what I have been working on. Enjoy!

Photo Credits: Header photo by Ebuen Clemente Jr

Well, here it is! The final blog for my midterm musical growth goal! This was such a fun adventure. From starting off with just wanting to play piano and sing at the same time, to experimenting with harmonies and GarageBand, this project has taught me so much and truly pushed my musical abilities.

Initially, I thought that singing and playing piano would be a challenge; however, I ended up finding this rather easy. Since I found this easier than expected, and the idea behind the project was to push your musical abilities and grow, I switched my goal to learning how to harmonize. This was a super fun task! I really enjoy singing so learning to harmonize was a great addition to my musical repertoire. I began working with harmonies mainly by playing a note on the piano, finding a third, fifth, or seventh, and imitating this sound. From here, I would try playing a note and finding the harmony without the piano. For me personally, I struggled with lower harmonies more than I did with higher harmonies. For some reason, I found it much harder to keep the harmony going, without hitting the wrong pitch, in the lower range of my voice. Because of this, I decided to work on high harmonies first. I practiced harmonizing with any song that came on until I got somewhat comfortable with it. After this, I began working on the songs that I chose for my midterm display. These songs include “Perfect” and “Afterglow” by Ed Sheeran. These songs are really great songs to work with when working on higher harmonies. My favourite place to practice these harmonies was while driving in my car. The privacy really allowed me to open up and not be afraid to mess up or hit a wrong note. After getting to a point where I was comfortable harmonizing with these songs, I decided to challenge myself further by working on a song that incorporated some low harmonies. For this song I chose to work with “Anyways” by Noah Kahan. This song has a mixture of high and low harmonies which really challenged me. After getting to a point where I was comfortable with these songs, I recorded them using GarageBand. This was a whole other challenge!

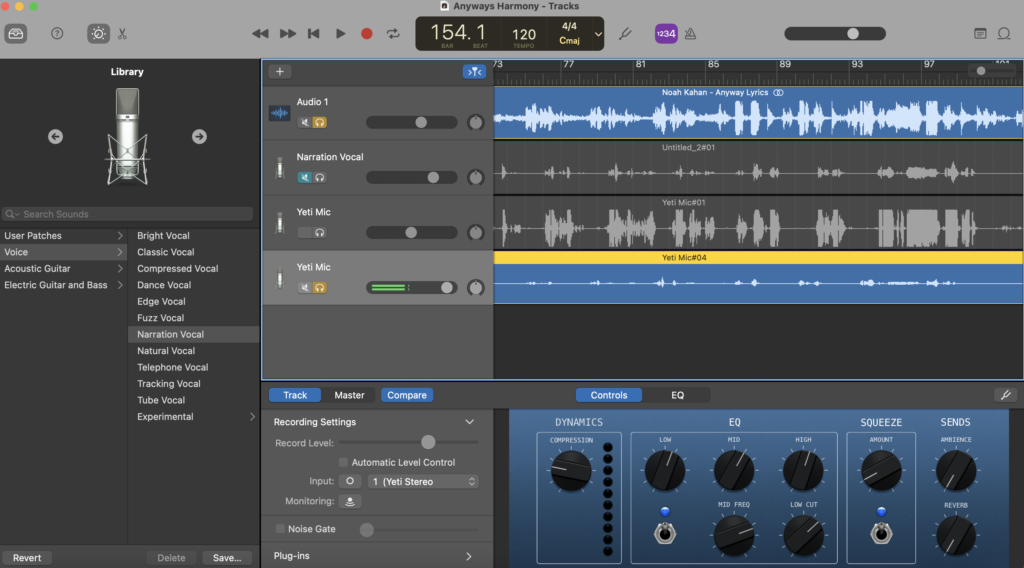
My GarageBand mix for “Anyways”

This project was the first time I experimented with using GarageBand. Luckily, I had my sister and dads help figuring it out, but it was still challenging. My first challenge was figuring out how to get an audio recording of the actual song onto GarageBand so I could record over it. I ended up having to create an mp3 audio file and upload it as an audio track. Once I finally got this set up, I struggled getting the microphone and headphones setup. First there was the struggle of finding the right chords and adapters I needed for my MacBook. Once my dad helped me find all the right tools, I had to get help figuring out how to set up the input and output options on GarageBand and make it so that each track has the right preferences. Once all of this was solved, I was finally able to record. Although I would have loved to experiment with cutting and rerecording sections, I did all the recordings in one take as I did not have time to work this feature of GarageBand within the deadline. The next interesting part about working with GarageBand is that is strictly an audio tool. Because of this, I had to experiment with how to attach video file to the GarageBand audio file. In order to do this, I recorded a regular video of me singing on my iPhone, muted this file, and synced it with the audio file. The only problem with this was getting the files to sync up accurately. In order to solve this, I went to my dad for help. He showed me a technique that he uses to fix this issue. In order to make sure the files line up perfectly, you need to clap at the beginning of both your video recording and audio recording on GarageBand. If you do this before you start the actual recording, you can line up the claps and then you won’t cut out any of the song.

My new goal had lots of struggles that came along with it, but it was extremely worth it. I now feel way more comfortable with both harmonizing and GarageBand. This project pushed me cognitively in areas including translating notes and rhythms, recognizing pitch, sensory integration and more. Emotionally, it allowed me to relieve stress, encouraged exploration and creativity, and more. So, without further ado, here are the videos (of me harmonizing) that pushed my musical development so much! I hope you enjoy!!

[SEE BRIGHTSPACE FOR VIDEOS. FILE SIZE IS TOO LARGE]

Photo Credits: Header photo by Israel Palacio

Todays class was all about educational video. It is crazy to think about how much we rely on video for things from cooking tutorials, to helping us with math problems, to figuring out how to fix our cars. Videos can be a great educational resource and enhance often enhance the learning experience and our understanding of concepts. So how do we create these educational videos? And how do we incorporate videos in an effective way?

There are countless way to create educational videos. You can use programs such as screencastify, iMovie, Camtasia, Quicktime, and more. All these programs are great ways to create educational video; however the thing that stood out to me in the section of the lesson was actually the tips to recording a successful video. One of think links Michael shared with us an edutopia blog about making your own instructional videos. This resource provides some tips that I think are extremely important when making educational videos.

1. Chunk Instruction - You can only truly keep your viewers attention for so long so keep videos short, sweet, and to the point!
2. Build video ready slides - Create slides that are clear, simple, and visually appealing. This is the most effective way to keep attention and explain your points effectively.
3. Enhance Engagement - Imbed way for participants to engage such as questions and activities
4. Be Yourself - Relax, breathe, and don't be afraid to mess up! Natural, conversational speaking is more engaging, and being personable is key.

I think these tips are great and are things that I personally need to remember if I am creating educational video. I particularly like the tip about chunking instruction as it is critical to remember how long you can really keep your audiences attention for. I also think the tip about being yourself is very relevant to me as I often get very nervous recording myself.

In addition to creating educational videos, we also talked about how to effectively incorporate video. This included learning how to imbed videos into your work properly, linking a video to a particular section, turning on closed captions, and changing the speed a video plays at. The thing that stood out most to me was linking a video and being able to have it start at specific section. I did not know this was possible! So useful! I have incorporated a YouTube video below to display this new skill I have gained. I can also confidently say that I now know how to used closed caption and change the speed of videos. All really useful things to know.

Finally, one cool thing that I was inspired to try out after todays class was creating a gif. It is nothing special but here is a gif I created using Animated Gif Maker!

Photo Credits: Header photo by Thomas Russell

Learning to sing while playing the piano has been going really well! I am about halfway to the midterm checkpoint for my musical growth plan and I have been progressing faster than expected. I have been really enjoying the chance to have a creative outlet amongst the business of school. I have been taking advantage of the opportunity to practice playing and singing together… maybe even too much. Thus far, I have accomplished all the songs I originally considered in my growth plan. I can play and sing “Drivers Licence” by Olivia Rodrigo, “Hallelujah” by Leonard Cohen, “Perfect” by Ed Sheeran, and “Skinny Love” by Birdy. I have also gone on to learn a few more songs such as “Give Me Love” by Ed Sheeran and “Someone Like You” by Adele.

Reflecting on my journey so far, I started off really nervous and timid with singing. Although I have performed in front of audiences before, I don’t often do both singing and playing piano together. As the time has gone on and I have gotten more comfortable, I have been opening up more and caring less about who in my household hears me practicing. I have even let my significant other hear one of my songs which is a big step for me. I am pretty comfortable playing and singing when I am alone; however, I must admit that I am still pretty self-conscious in front of others. I do not like feeling like I am being judged. Although I have found myself worrying about this (even though it is just my own family that hears me practicing), I do still really enjoy doing it and could see myself continuing to do it even after this assignment and class.

As I mentioned above, I have progressed through my original goal quite quickly. For this reason, I have decided to further my goal and take on something new. I am now going to look into harmonizing. I am hoping that my the midterm deadline I will have a recording of me harmonizing with a recording from another artist. I thought this would be a cool new goal that would continue to push my boundaries!

Harmonies require a good ear and understanding of pitch and chord structure. When harmonizing you are usually pulling another note from the chord to sing overtop of the original note. For example, if you have a C chord, you could take the 3rd of the chord which is an E, the 5th of a chord with is the G, or sing a full octave above which is another C note but higher on the scale. There is also another type of harmony, known as a “close harmony”, which is a note that is very close to the other note on the scale. This is often what you hear when you listen to barbershop quartets and pop groups like the Beach Boys.

Over the remaining time I have before my midterm critique, I am going to experiment with learning harmonies and trying different types of harmonies. I am thinking of taking one of the songs I have already learned (most likely “Perfect” by Ed Sheeran) and instead of singing melody, singing a harmony overtop of the singer himself. I am also hoping to experiment with a few other songs so I can try more harmonies. I am thinking of experimenting with “Anyways” by Noah Kahan and “Afterglow” by Ed Sheeran. My hope is to incorporate multiple different harmonies throughout the course of these songs. These three songs are my new goals for my musical growth plan and are what I hope to display for my midterm evaluation!

In order to aid in my new goal, I have found a couple resources that may come in handy:

https://www.youtube.com/watch?v=6Vy8opl_J8s
https://www.youtube.com/watch?v=_gZPfm74rac

Additional Online Resources:

That’s all for now! I look forward to showing you my progress in the near future! Hopefully in a couple weeks I will be harmonizing like there’s no tomorrow!

Photo Credits: Header photo by Michal Czyz on Unsplash

This week I am looking into one of the most critical parts of being a high intensity athlete. In order for your muscles to recover, your body to function optimally, and your achieve gains in your muscles, you bust rest and actively focus on recovery. Recovery consists of two categories: 1. Immediate or short-term recovery and 2. Long-term recovery. Short term recovery occurs within hours of physical activity. This includes things such as low intensity exercise after working out and during the cool down phase. Long-term recovery is anything that comes after this. This can include things that are built into your reoccurring schedule, such as a recovery day or regular yoga sessions, or things you do after physical activity in attempt to jump start your recovery, such as rolling and ice baths.

From past experiences, research, and talking with different coaches and personal trainers, here some ways to jump start recovery and repair your body:

  1. Sleep!! The deep stages of sleep cause an increase in blood flow which brings oxygen and nutrients that repair muscles and regenerate cells. In addition, while we sleep a hormone called growth hormone is released. This hormone stimulate muscle repair and growth. On top of this, prolactin (which is another hormone) is also released. This hormone helps regulate and reduce inflammation. Overall, sleep is one of the most important parts of recovery as, “Muscles and tissues repair and rejuvenate as we sleep.”
  1. Refuel right after activity – The sooner you can eat and drink after training, the faster your body will start to recover. Replenishing your body is critical in order for your body to have the ingredients in needs to recover. Eating within 20 minutes of finishing a workout will greatly aid in your recovery.
  2. Reflecting on how you feel – Reflecting on how you feel is a good way to spot problems early. Things such as your mood, energy levels, sleep quality, how your muscles feel etc. are all things that can indicate if you are getting enough rest, if you are getting sick, and if you need a break
  1. Hydrate and replace electrolytes  When you sweat, you lose water and a lot of electrolytes. Being properly hydrated helps flush out toxins, transport nutrients into the cells, regulate body temperature and pH balance, and help with muscle soreness and stiffness.
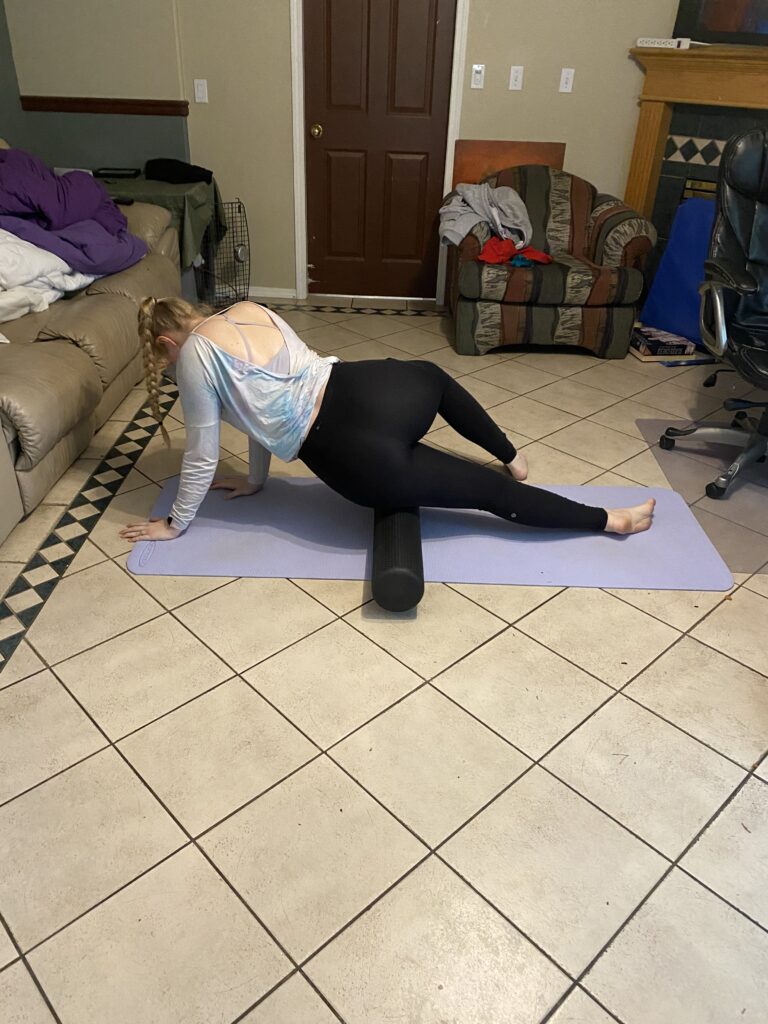
  2. Practice foam rolling – Foam rolling triggers the sudden relaxation of muscles by applying tension to the tight spot. Rolling help bring blood to the muscles, stretch and lengthen them, and improve range of motion and flexibility which can prevent injuries
  3. Enjoy an infrared sauna 30-minute session one to three times per week is great for minimizing pain and loosening muscles. “Infrared light penetrates the skin to stimulate cells’ mitochondria and expedite healing. It’s especially good for soft tissue, which includes ligaments and tendons that are slow to heal because they don’t get a lot of nutrients.”
  4. Icing, ice baths, and cold showers – Icing help reduce swelling and flush out lactic acid in the muscles which aids in recovery
  5. Stretching and yoga!

Without proper recovery, you cannot repair your body, gain muscle, or be an optimal athlete. Because of this I decided to start doing yoga this week on top of my other routine recovery procedures which include foam rolling, icing, and more. Here is a short video below of me working through a yoga flow to improve my flexibility, range of motion, and overall recovery!

Created using EZGIF.com

Photo Credits: Header photo by LOGAN WEAVER